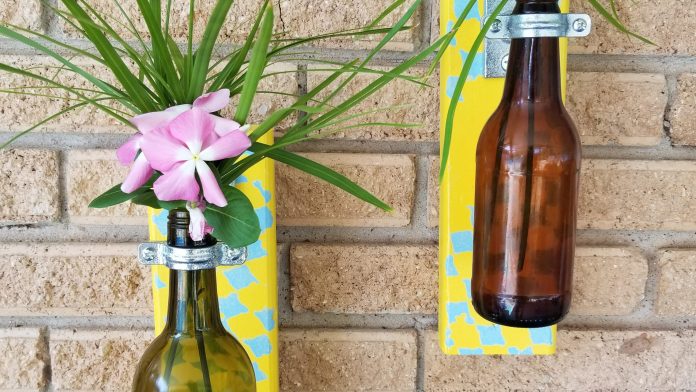
Editor’s Note: a charming way to use recycled wine bottles by transforming them into wall vases. Enjoy!
As we get nearer to Labor Day and the “unofficial” end of Summer, you may be thinking about doing a few things to spruce up your home or change your decor for the upcoming Fall and the soon-to-be-upon-us holiday season. Looking in home decor stores and on-line websites, the current trend in accessories and wall hangings is more toward the rustic, farmhouse look and/or the simple, industrial look. While these items are very attractive and useful, they can be very expensive and take a bite out of your wallet. I have a great idea to make your own industrial wall vases and it incorporates one of my favorite things, recycling. Plus, it can be done at a fraction of the cost. So, let’s get started!
Materials Needed:
- Old wine, beer or soda bottles, cleaned of labels, washed inside and out and dried
- 2×4 stud, cut into 8″ OR 12″ length (mine are cut to 12″)
- Sand paper
- Paint primer
- Paint or wood stain in your choice of color
- Saw tooth picture hangers
- 3/8 galvanized steel ceiling flange
- #14×1 1/4″ flat head phillips head screws
- 3″x3/8″ threaded rod
- 3/4″ split ring hanger
- Tape measure or ruler
Step One:
Using the sandpaper, sand your boards smooth, especially the cut edges. Apply the paint primer to front, back and all edges. Let dry completely. Apply paint color of your choice to entire board and let dry completely. You can now decorate the board, if you wish. I used a simple stencil, in a contrasting color, to give my project a retro ’80’s modern look. This is completely optional. Alternatively, you could skip the primer and paint and use a wood stain in your choice of color, to give a more traditional look.
Step Two:
Turn your board face down. Measure 1 1/2″-2″ down from the top of the board. Place your saw tooth picture hanger here, make sure it is centered and level, and attach with the provided brads.
Step Three:
Turn the board face up. Measure down 1″ from the top edge and make a mark. Place the ceiling flange vertically on the board, make sure it is level and straight and align the top edge with the mark you just made. Screw in the flat head phillips screws into the holes in the flange. It will be easier at this step if you drill a pilot hole for the screws.
Step Four:
Take the 3″ threaded rod and screw it into the face of the ceiling flange, making sure it is tight and secure. You can use a pair of pliers to help you tighten the rod in place.
Step Five:
Separate the split ring hanger into two pieces. Place one half of the ring around the back of the bottle neck, just under the lip, place the other half of the ring around the front half of the bottle,again just under the lip and screw the two halves together, using the provided screws. CAUTION: Do not overtighten the screws. you want the ring tight enough so the bottle doesn’t slip out, but you should be able to twist the ring around the bottle neck, with little effort. Making the ring too tight will cause your bottle to shatter. Trust me on this. You might even want to use gloves and safety googles during this step, just in case.
Step Six:
Thread the ring, with the bottle, onto the threaded rod and screw into place. CAUTION: Again, do not over-tighten the ring on the rod. Over-tightening the ring will cause the rod to put too much pressure on the bottle and cause it to break. The ring should be attached securely, but the bottle should be able to swing freely. Now, hang it where you would like it, fill with water and place your favorite flowers in it. You’re done!
Alternatively, you could thread some battery operated fairy lights into the bottle and attach the battery pack to the side using double side tape. If you’re really handy, you could use a router and carve out an appropriate sized hole in the back of the board for the battery pack to fit into. You could also use small candles placed into the bottle opening, for soft, mood lighting. Just remember to never leave a flame unattended and never let the wick get more than 1/2″ long. Or, just use a battery operated faux candle.
With just a little time, effort and a few supplies from the home improvement store, you can fashion your own, one-of-a-kind recycled bottle wall vase or sconce. It’s fun and easy. I hope you give it a try!
Happy decorating!
Wichitan Chip Kouri — who participates as a teaching artist in the Wichita Falls Alliance for Arts and Culture that gave us the Don’t Fence Me In project, as well as starring in community theater productions such as “Sister Act” and “Mamma Mia” — takes us along as he creates some of his home, gardening and entertaining favorites.
Read or Share this story: https://www.timesrecordnews.com/story/life/2019/08/17/around-home-recycled-bottle-wall-vase/2033760001/


